Equipment Slots & Storefront V2
Learn how to make the most of Rooms 2.0 Econ tools using Equipment Slots and Storefront V2.
August 9, 2024
This blog post goes into detail about two features that accompany the Econ Tools in Rooms 2.0 (Room Inventory + Offers), including step-by-step instructions on how to implement some of the common use cases.
This blog post goes into detail about two features that accompany the Econ Tools in Rooms 2.0 (Room Inventory + Offers), including step-by-step instructions on how to implement some of the common use cases.
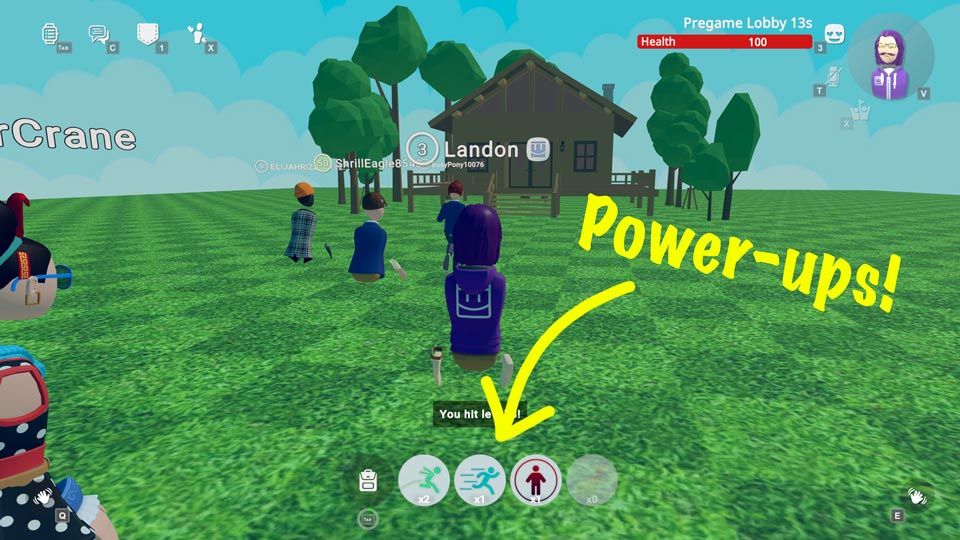
Equipment SlotsEquipment Slots is a feature that displays Inventory Items on the bottom of the screen and allows them to be ‘used’ by touching them or with hotkeys. Think of them as a shortcut for users to use an Inventory Item without having to go to their Backpack. Creators can enable/disable them via circuits or allow users to assign Inventory Items to the Equipment Slots of their choice.

^MyLittleMonsters
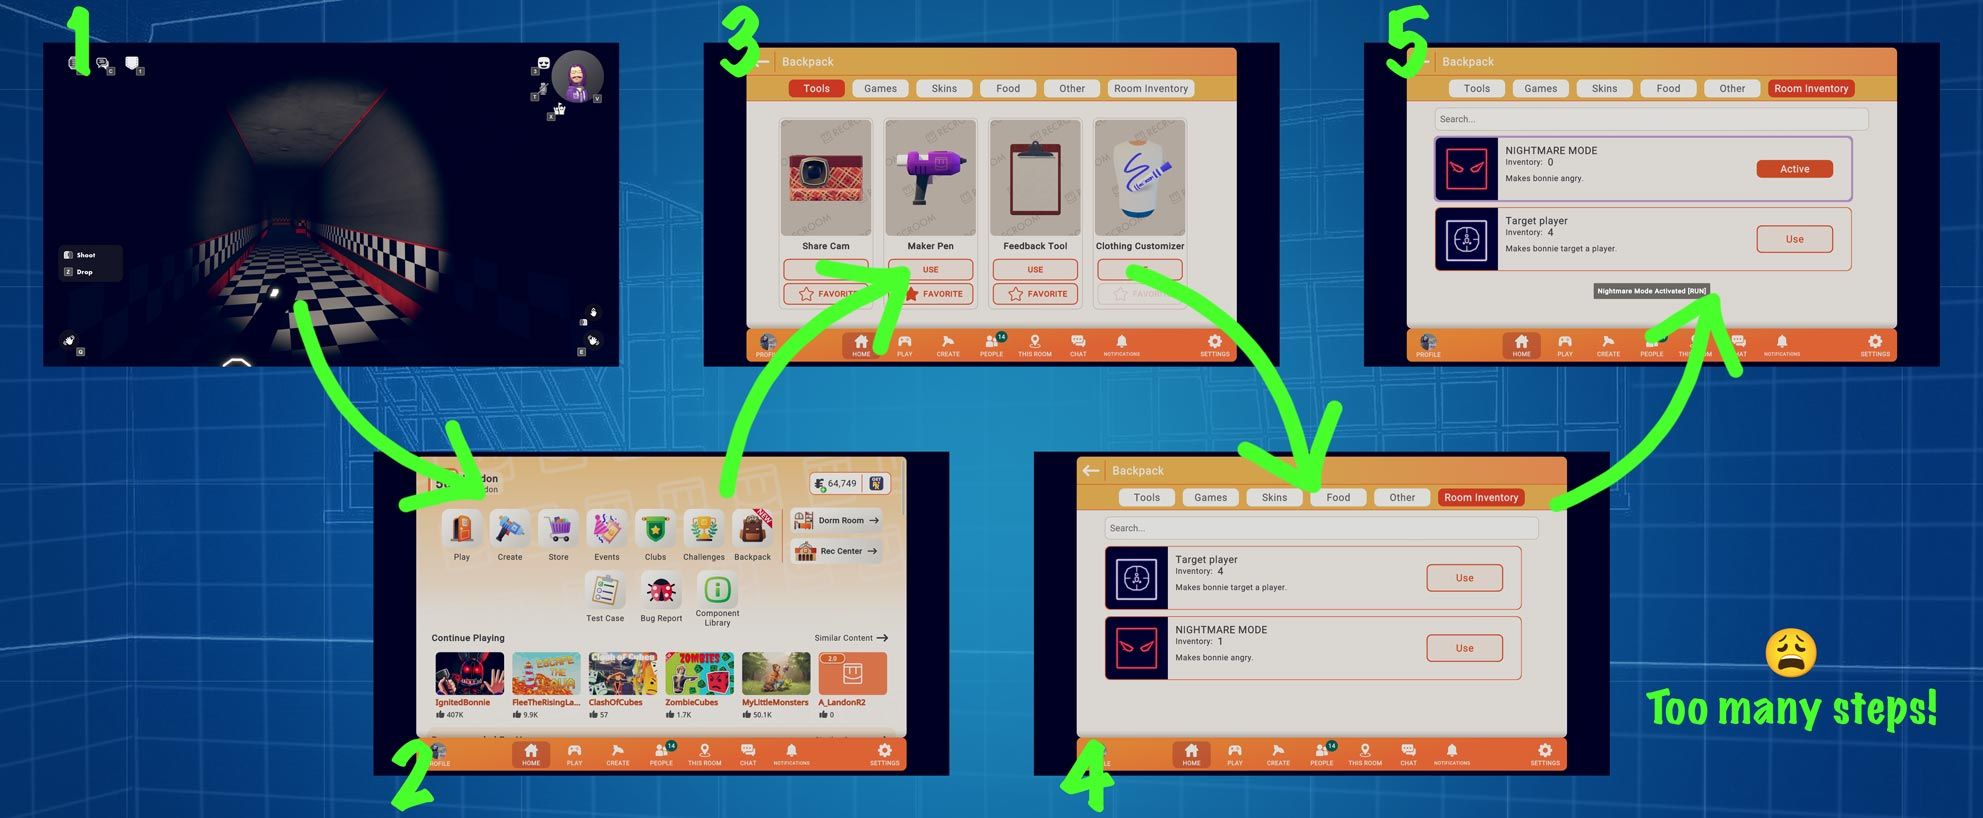
ContextWhy did we make Equipment Slots? Well, we heard a lot of feedback regarding the difficulty of using Room Consumables—you had to open your watch, click on the Backpack, find the Room Consumable you wanted to use, then press the ‘Use’ button. There were a lot of steps that left Creators worried that their consumables weren’t as valuable because people didn’t know how to use them; And if people didn’t use them, why would they purchase any more?
^IgnitedBonnie
Use CasesEquipment Slots are designed to be a shortcut for using Inventory Items, but they can also serve other functions. Some examples include:
- Equipment Manager: Use an item as a shortcut to equip an item or weapon in a user’s hand.
- Ability Hotkeys: Items can function like unlockable abilities, such as flight, fireballs, or regeneration.
- Custom UI Shortcuts: Does your game need a menu Rec Room doesn’t have? You can tie an Item to opening a UI panel in Rec Room Studio.
- Special Interactions: We’ve seen players turn slots into a tool for entering secret codes, a currency display, health meter, and more.
^FleetheRisingLava
How it Works
RequirementsA few things to keep in mind when using Equipment Slots:
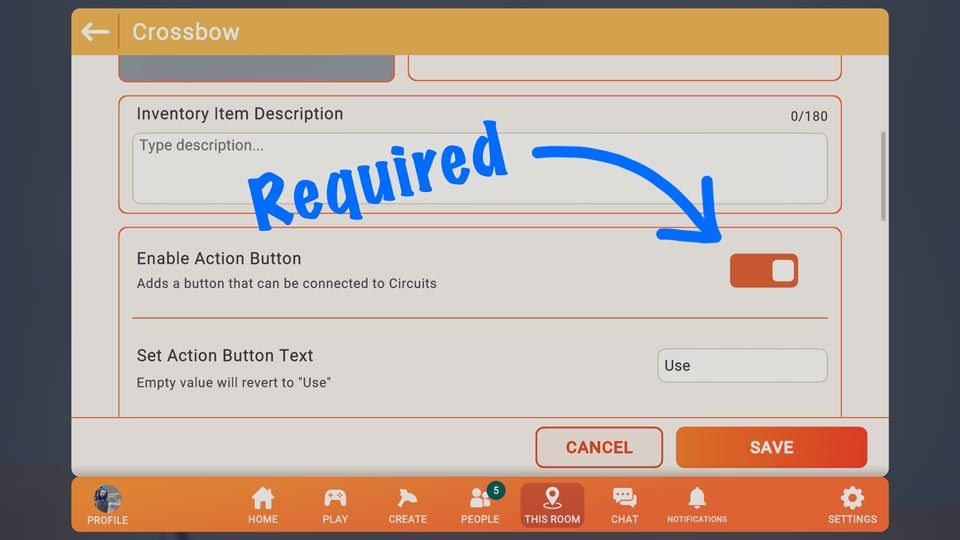
- Inventory Items must have ‘Enable Action Button’ enabled to equip to an Equipment Slot
- Users must have at least one Inventory Item in order to equip to an Equipment Slot
- Equipment Slots must be enabled via circuits (even if you allow users to assign items themselves)
- Make sure that you follow-up with the ‘Event Receiver: Inventory Item Used’ chip so that something happens when the user interacts with the Equipment Slot
Setting up Equipment Slots via circuitsHere’s what you need:
- Inventory Item with the ‘Action Button’ enabled (in the Inventory Item Settings)
- ‘Inventory Item Constant’ chip
- ‘Equipment Slot’ chip
- ‘Player Set Equipment Slot Is Enabled’ chip
- ‘Player Equip Inventory Item’ chip
- Some event to enable the equipment slot (In this case, we’ll use ‘Event Receiver: Player Joined’)
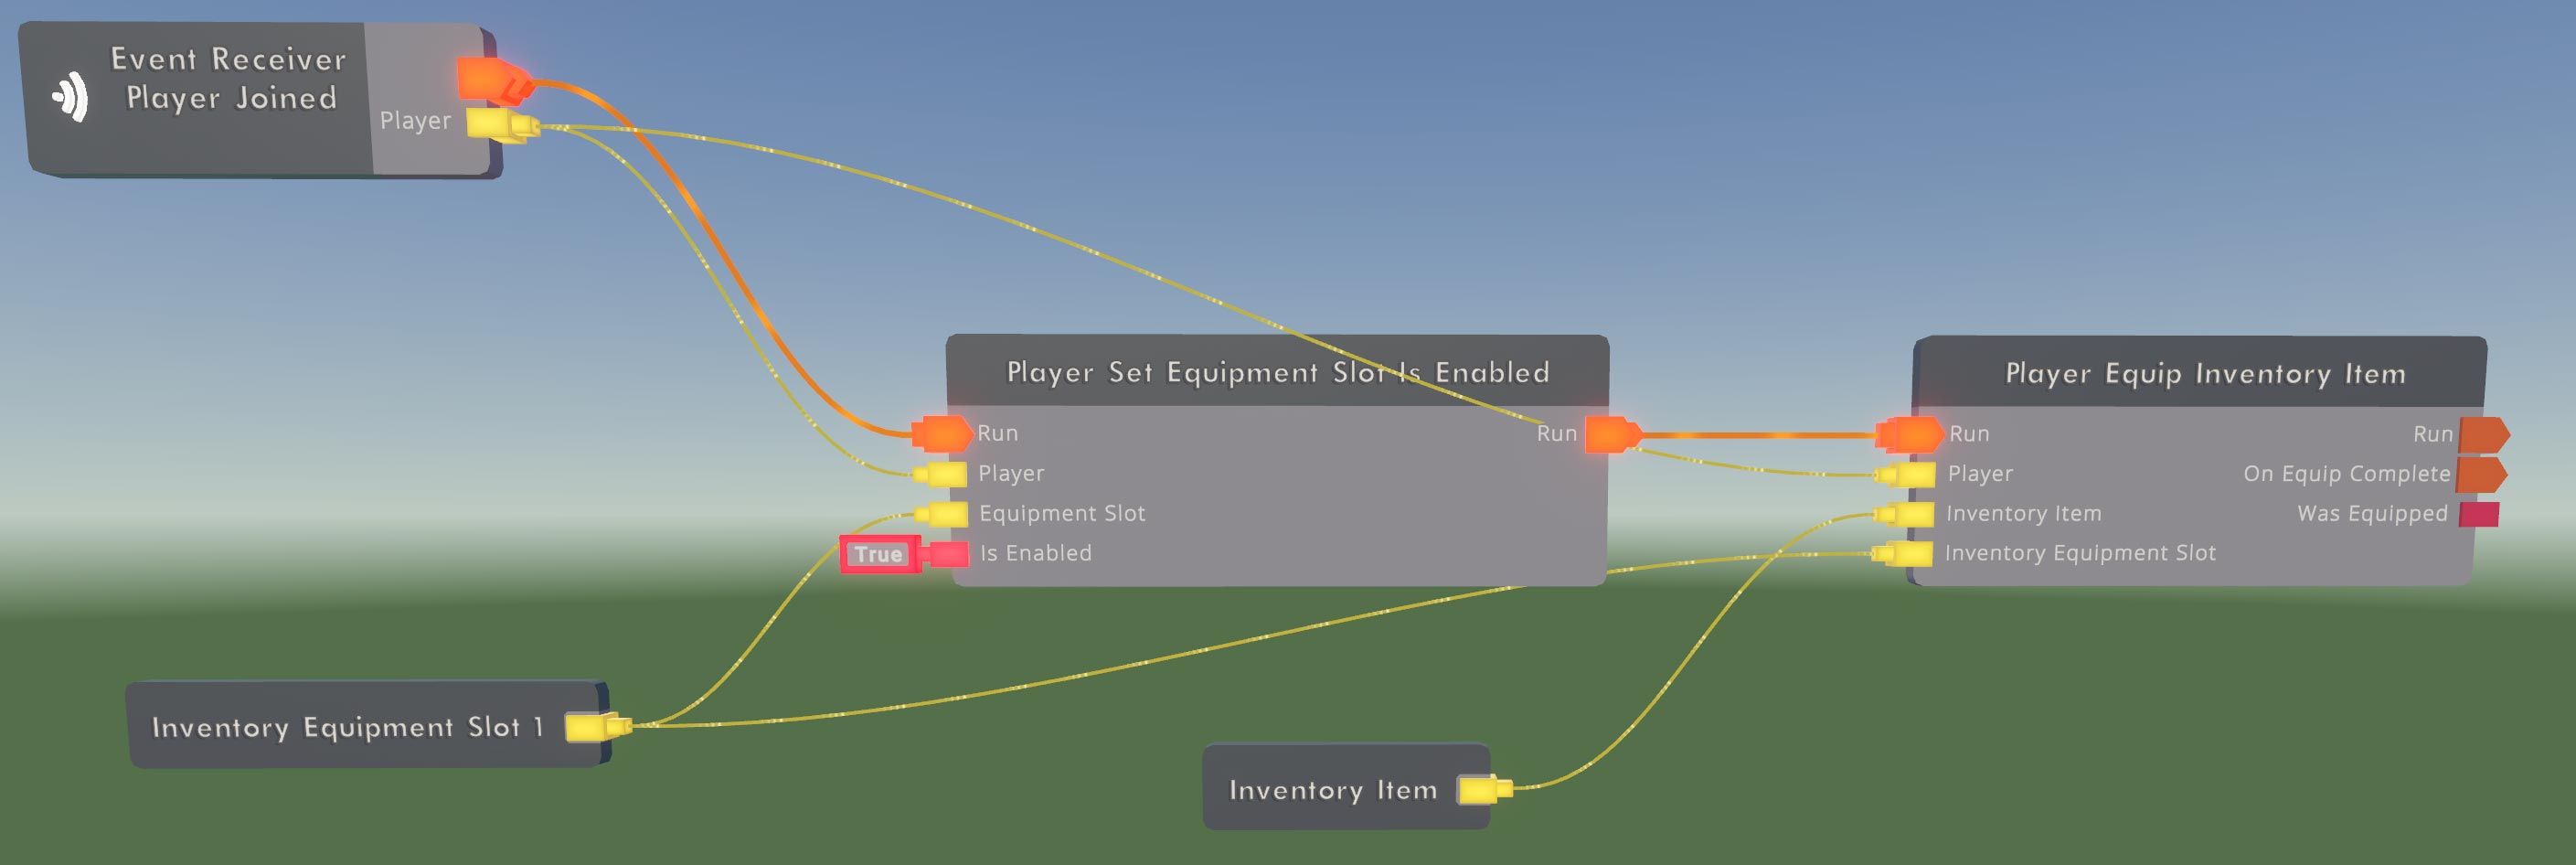
First, make the following configurations:
- ‘Event Receiver’ configured to ‘Player Joined’
- ‘Inventory Item Constant’ configured to your Inventory Item
- ‘Equipment Slot’ chip configured to the appropriate slot
- ‘Player Set Equipment Slot Is Enabled’ = True
Next, make the following connections:
- ‘Equipment Slot’ (Equipment Slot) → ‘Player Set Equipment Slot Is Enabled’ (Equipment Slot)
- ‘Equipment Slot’ (Equipment Slot) → ‘Player Equip Inventory Item’ (Equipment Slot)
- ‘Inventory Item Constant’ (Inventory Item) → ‘Player Equip Inventory Item’ (Inventory Item)
- ‘Event Receiver: Player Joined’ (‘Run’ exec) → ‘Player Set Equipment Slot Is Enabled’ (‘Run’ exec)
- ‘Player Set Equipment Slot Is Enabled’ (‘Run’ exec) → ‘Player Equip Inventory Item’ (‘Run’ exec)
- ‘Event Receiver: Player Joined’ (Player) → ‘Player Set Equipment Slot Is Enabled’ (Player)
- ‘Player Set Equipment Slot Is Enabled’ (Player) → ‘Player Equip Inventory Item’ (Player)
Allowing users to set up their own Equipment Slots

^Extreme-Dropper
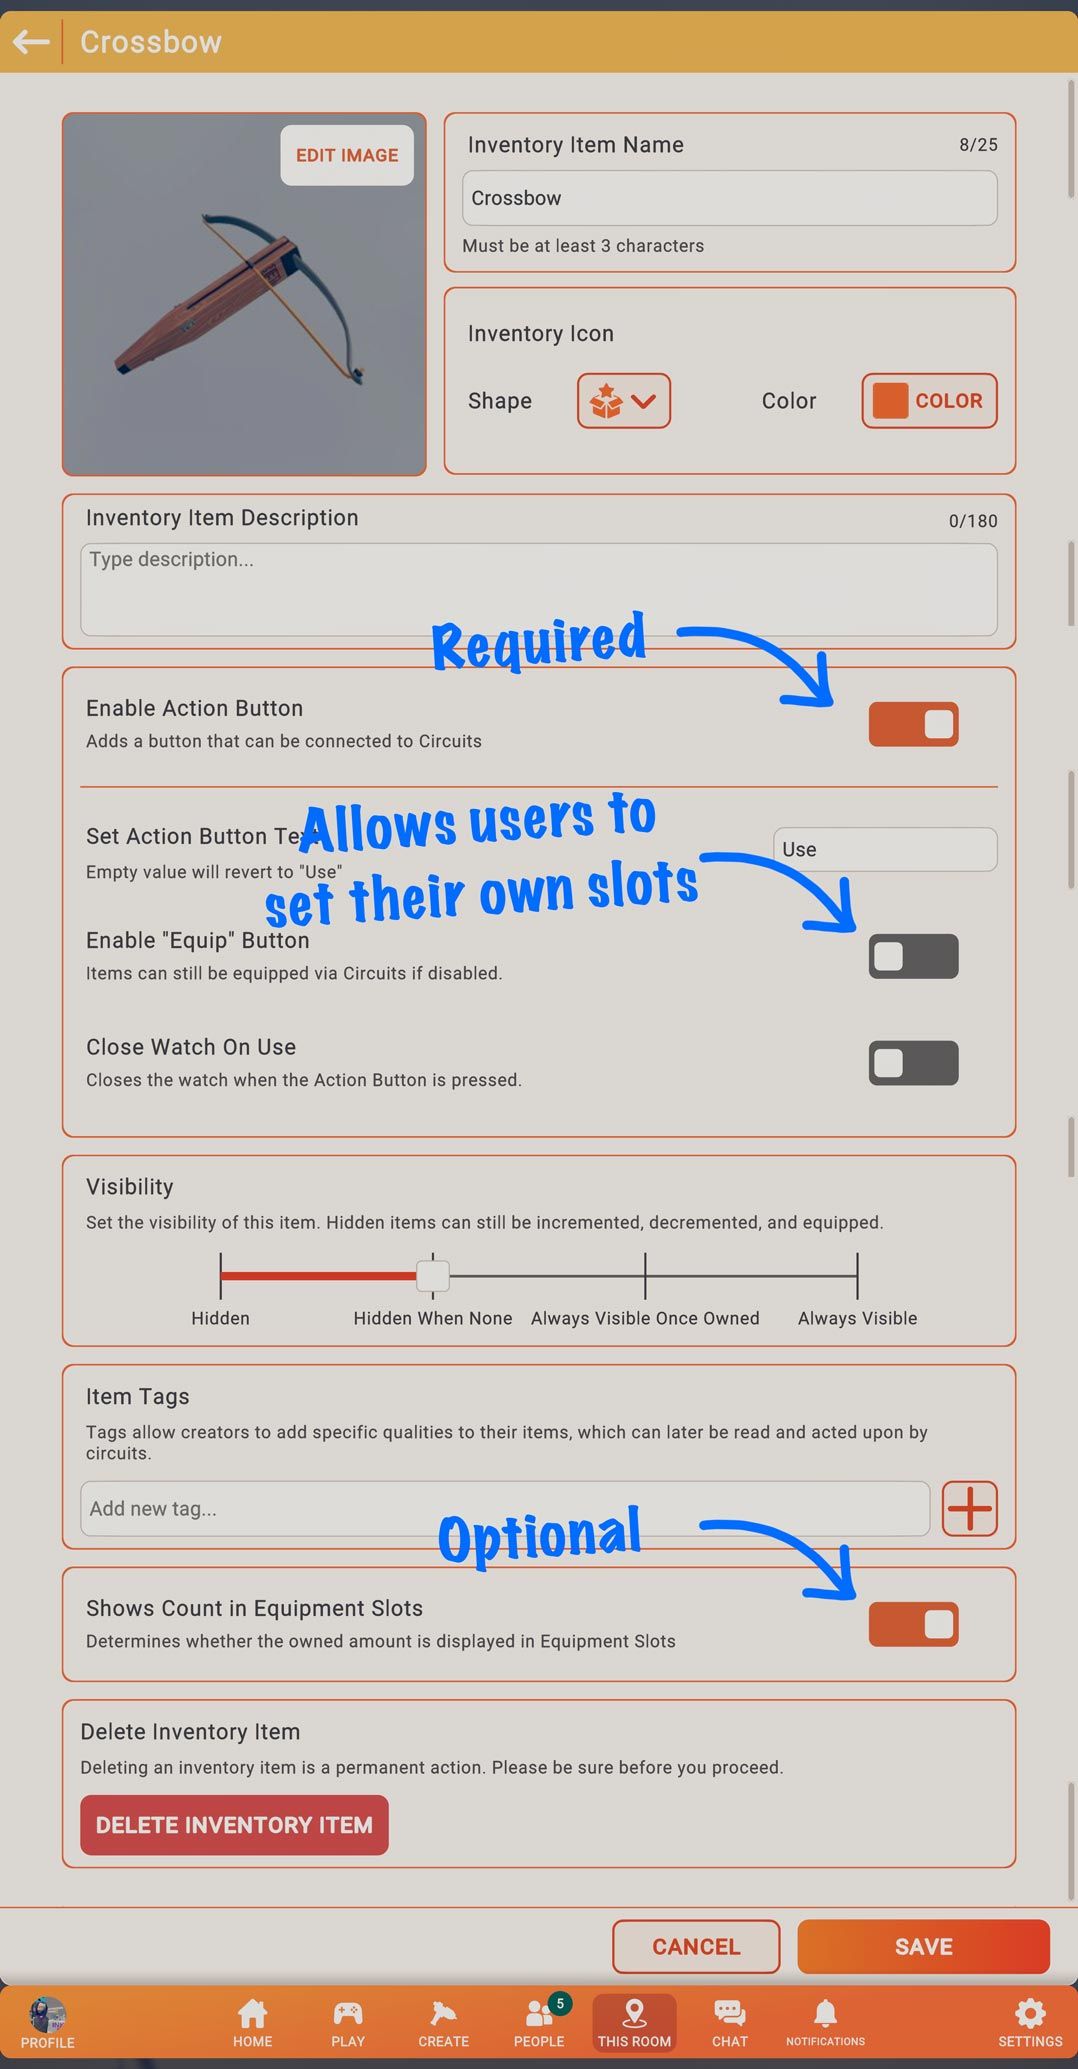
- Go to the ‘This Room’ page
- Go to the ‘Inventory Items’ tab
- Click on the Gear icon for the Inventory Item you want to set
- Set ‘Enable “Equip” Button’ to True
This allows users to equip that Inventory Item to an Equipment Slot. However, you still need to enable the Equipment Slot(s) via circuits. Here’s what you need:
- ‘Equipment Slot’ chip
- ‘Player Set Equipment Slot Is Enabled’ chip
- Some event to enable the equipment slot (In this case, we’ll use ‘Event Receiver: Player Joined’)
First, make the following configurations:
- ‘Equipment Slot’ chip configured to the appropriate slot
- ‘Player Set Equipment Slot Is Enabled’ = True
- ‘Equipment Slot’ (Equipment Slot) → ‘Player Set Equipment Slot Is Enabled’ (Equipment Slot)
- Next, make the following connections:
- ‘Event Receiver: Player Joined’ (‘Run’ exec) → ‘Player Set Equipment Slot Is Enabled’ (‘Run’ exec)
- ‘Event Receiver: Player Joined’ (Player) → ‘Player Set Equipment Slot Is Enabled’ (Player)
- ‘Equipment Slot’ (Equipment Slot) → ‘Player Set Equipment Slot Is Enabled’ (Equipment Slot)
If you want to enable more than one Equipment Slot, you will need:
- ‘List Create’ chip
- ‘For Each’ chip
- ‘Equipment Slot’ chip (up to four)
- ‘Player Set Equipment Slot Is Enabled’ chip
- Some event to enable the equipment slot (In this case, we’ll use ‘Event Receiver: Player Joined’)
First, make the following configurations:
- ‘Equipment Slot’ chip configured to the appropriate slot (repeat for each one)
- ‘Player Set Equipment Slot Is Enabled’ = True
- ‘Event Receiver’ chip configured to ‘Player Joined’
Next, make the following connections:
- ‘Equipment Slot’ chip (Equipment Slot) → ‘List Create’ (Item) (Repeat for each ‘Equipment Slot’ chip)
- ‘List Create’ (List) → ‘For Each’ (Items)
- ‘For Each’ (Item) → ‘Player Set Equipment Slot Is Enabled’ (Equipment Slot)
- ‘Event Receiver: Player Joined’ (Player) → ‘Player Set Equipment Slot Is Enabled’ (Player)
- ‘Event Receiver: Player Joined’ (‘Run’ exec) → ‘For Each’ (exec)
- ‘For Each’ (‘Loop’ exec) → ‘Player Set Equipment Slot Is Enabled’ (‘Run’ exec)
Important Notes:
- Users must have at least one Inventory Item in order to equip to an Equipment Slot
- Inventory Items must have ‘Enable Action Button’ enabled to equip to an Equipment Slot

Components
Inventory Item Settings
- ‘Enable Action Button’ - Allows Inventory Items to be ‘used’; Required for Equipment Slots
- ‘Enable “Equip” Button’ - Allows users to assign Inventory Items to an Equipment Slot
- ‘Shows Count in Equipment Slots’ - Allows the number of owned Inventory Items to be displayed on the Equipment Slot
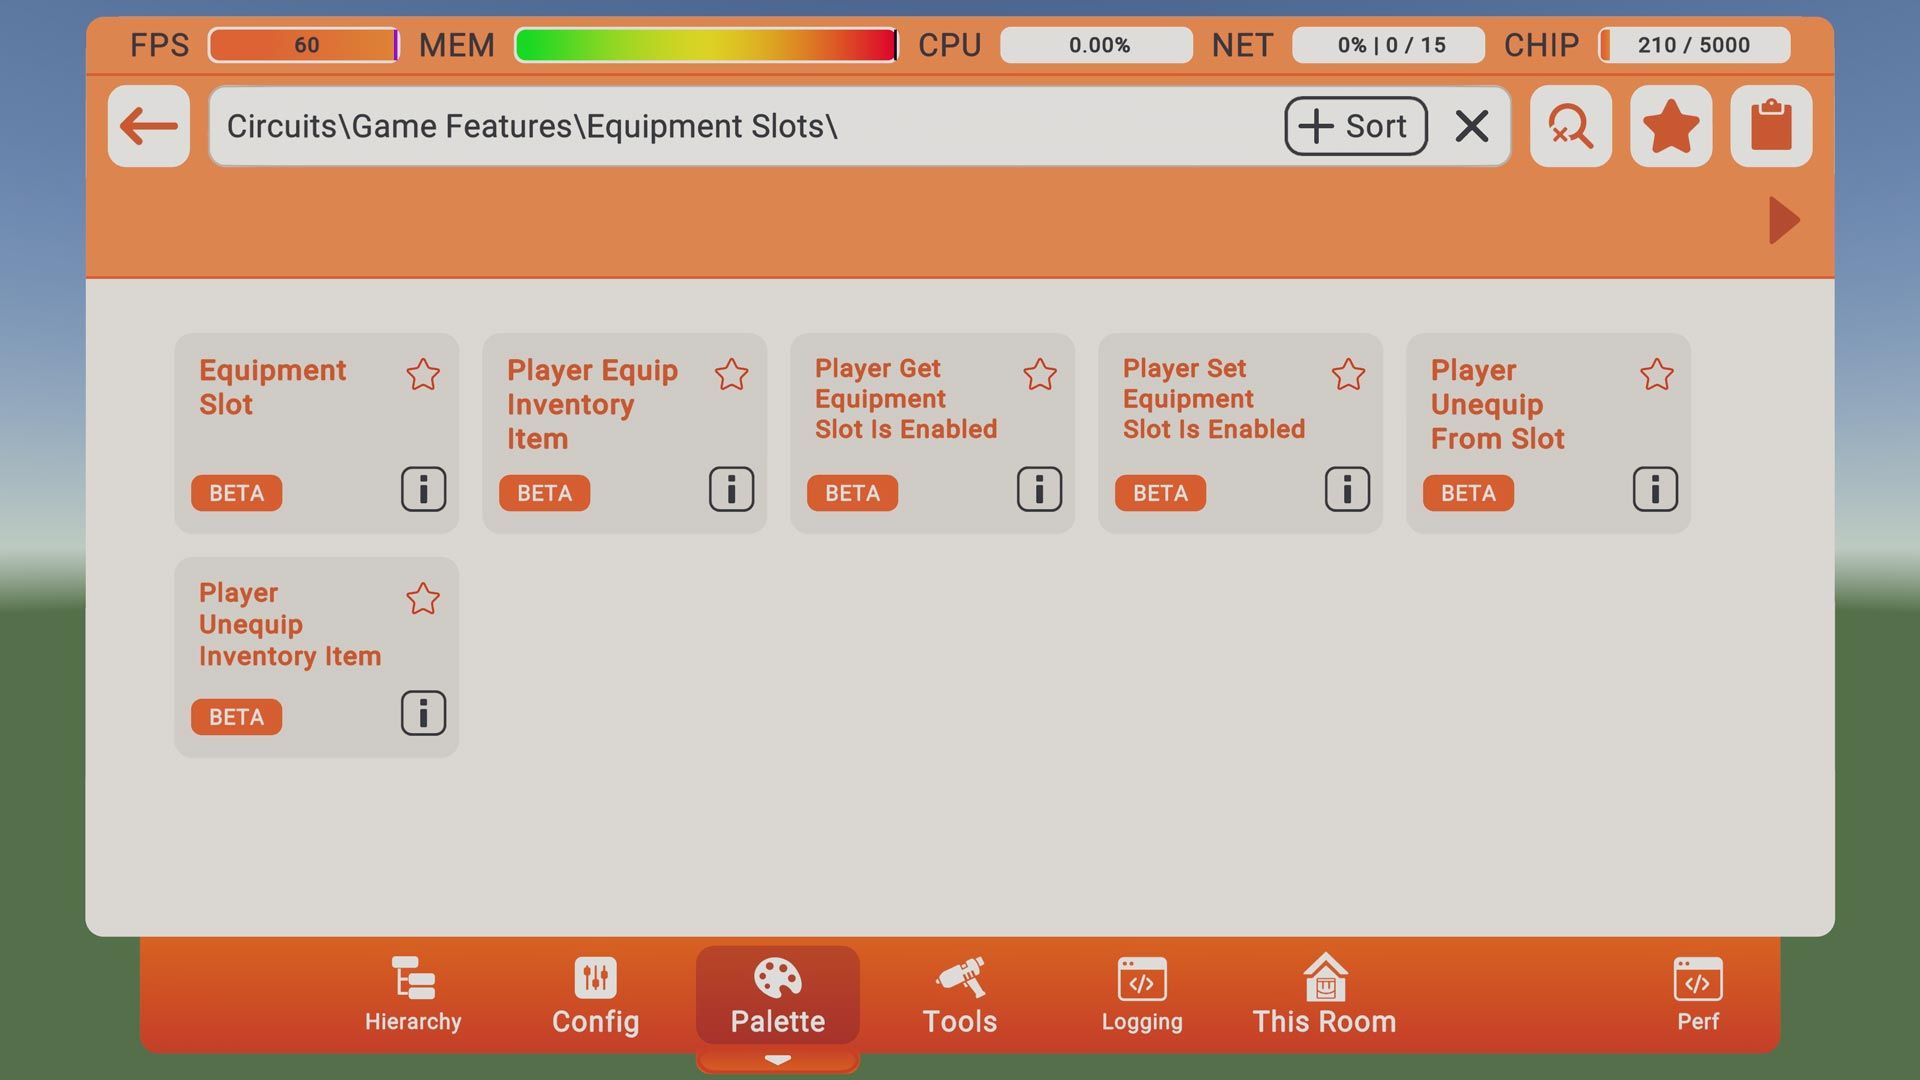
Circuits
- 'Equipment Slot’ (When configured, this reads as ‘Inventory Equipment Slot x’ where x is the Slot number—e.g., 1, 2, 3, or 4)
- ‘Player Equip Inventory Item’
- ‘Player Unequip Inventory Item’
- ‘Player Get Equipment Slot Is Enabled’
- ‘Player Set Equipment Slot Is Enabled’
- ‘Player Unequip From Slot’
Storefront V2Storefront V2 is a Container object that displays a group of selected Room Offers in a grid. Using the Storefront is likely to draw more users to purchase an Offer since there is familiarity with its UI across Rooms—i.e., people expect to find cool things to buy when they see a Storefront. Storefront V2 exist only in R2 and have several more features for flexibility compared to its Storefront predecessor in Legacy Rooms.
ContextAfter a lot of requests for Storefronts in R2, we wanted to take the opportunity to make a few improvements and establish the foundation for future iterations. The previous Storefront was limited in its use; You couldn’t hide or change the color/material of the background or change which purchasables are displayed via circuits. We wanted something that complimented the flexibility of the new Econ tools (Room Inventory + Offers) and gave us opportunity to iterate on UI in the future.
Use CasesWhy would you want to use Storefront V2 to sell your Offers?
- There’s no rate limiter for spamming (compared to ‘Show Purchase Prompt’ chip)
- You can hide the Storefront background (compared to Legacy Rooms)
- You can change the Color and Material of the Storefront background (compared to Legacy Rooms)
- You can hide the entire Storefront (compared to Legacy Rooms)
- Storefront can be either Synced or Local (compared to Legacy Rooms)
- Offers displayed on the Storefront can be modified via circuits (compared to Legacy Rooms)
- Consistent UI across Rooms (compared to custom Storefronts using RRS and/or ‘Show Purchase Prompt’ chip)
In general, you have more control over the Storefront in R2. If you only want to show certain Offers based on what level a user is at, you can do that—and without needing additional Storefronts! You could even create a full navigation system for viewing different types of Offers (as seen below)
^BaldZombie
How it Works
RequirementsThere’s only one requirement: You need to have at least one Offer to display!
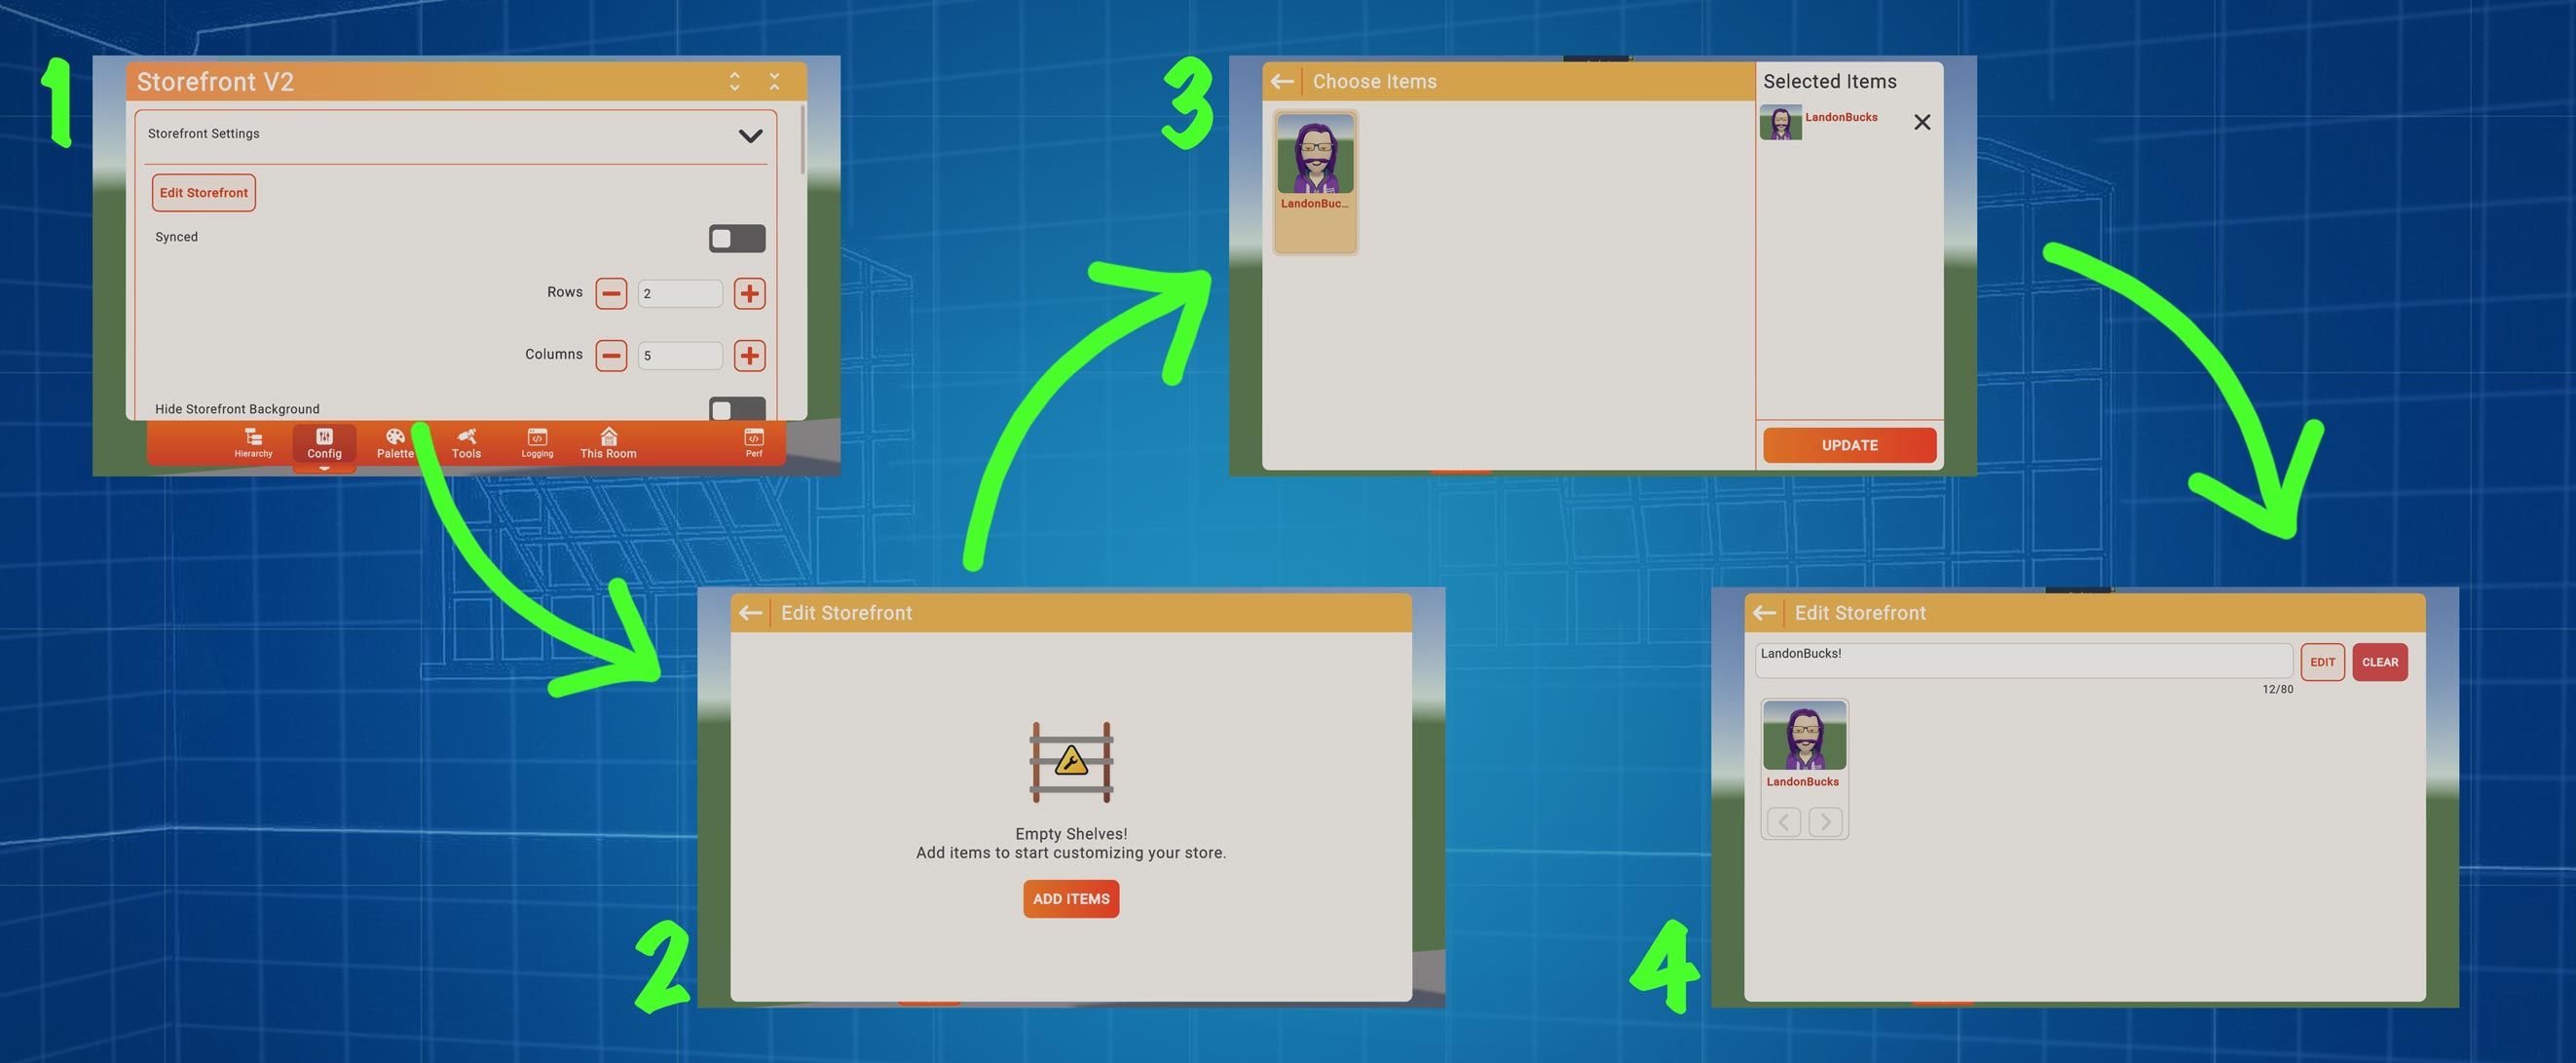
Adding Offers to a Storefront Manually
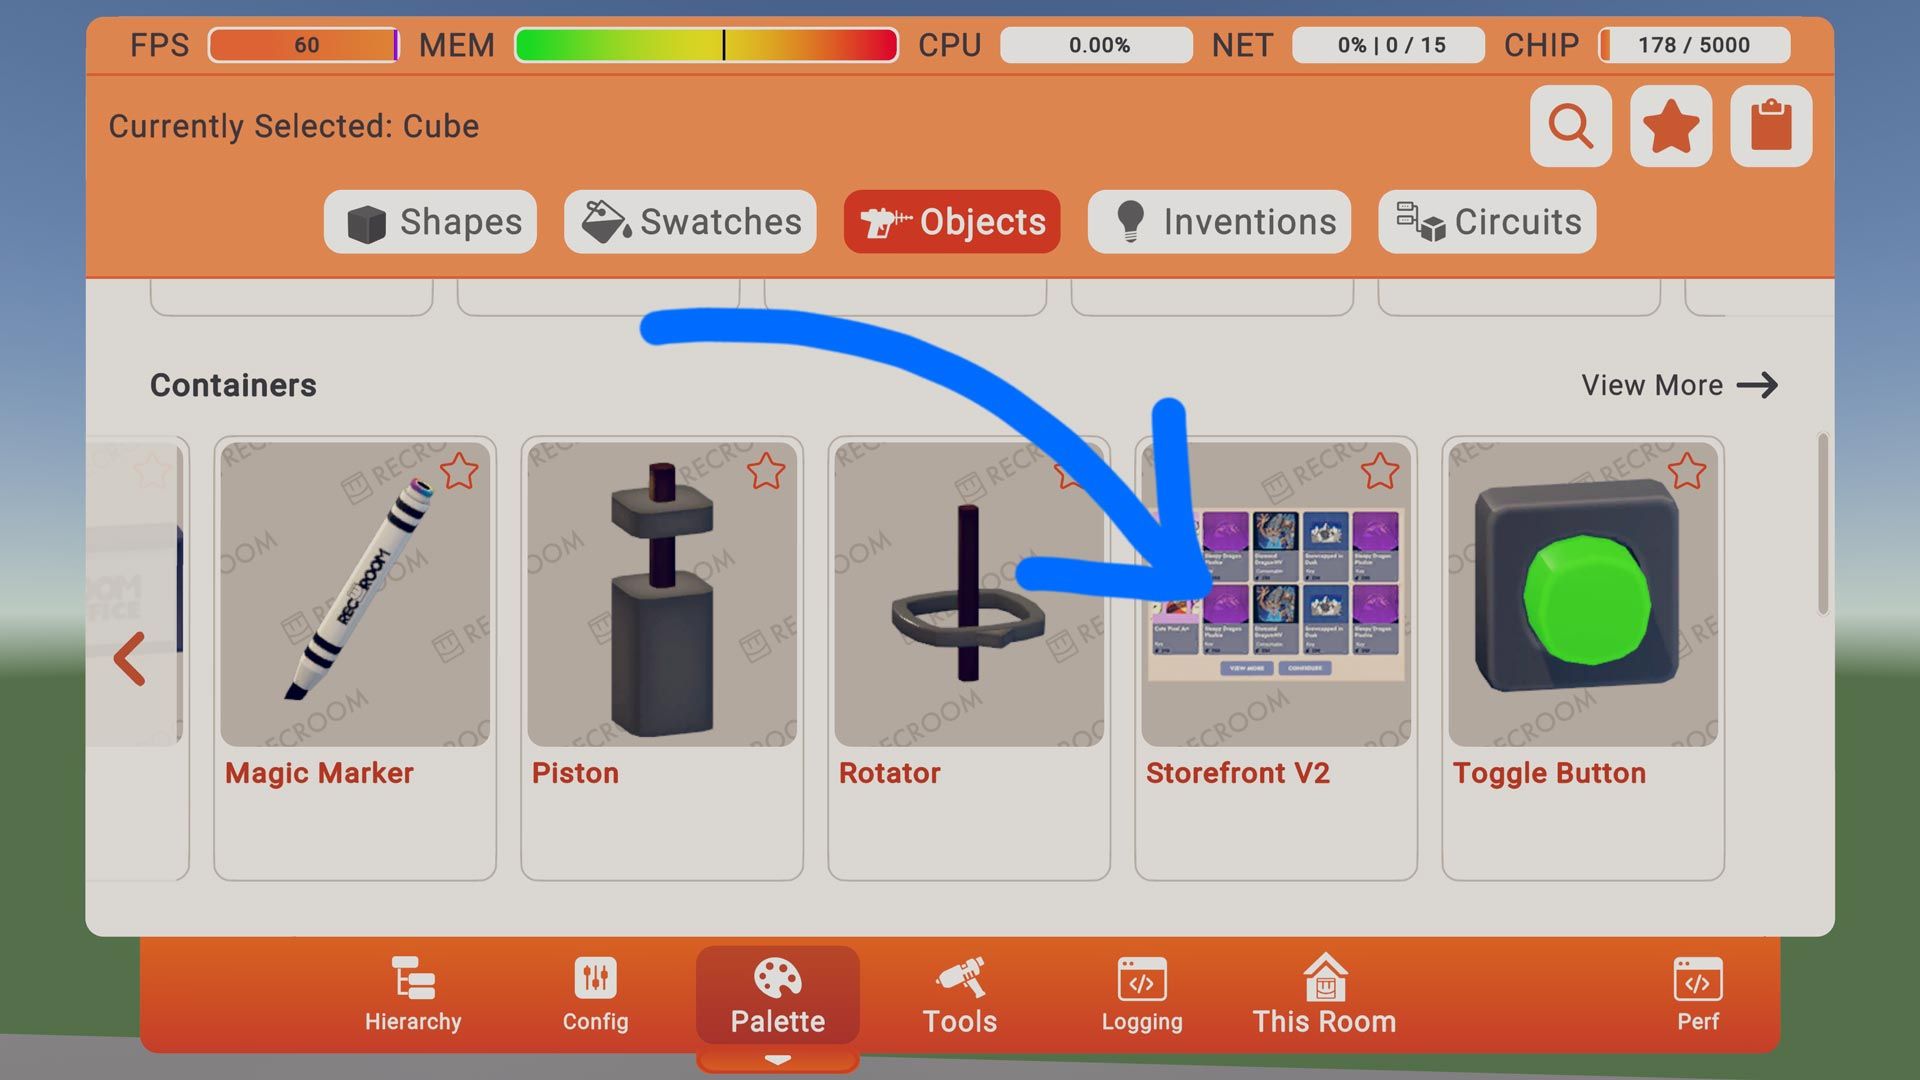
- Spawn in a Storefront V2 (located in the Maker Pen Palette → Objects (tab) → Containers)
- Press ‘Let’s Get Started’ or use the Configure mode on the Maker Pen
- Press ‘Edit Storefront’
- Press ‘Add Items’
- Selected items that you want to display, and press ‘Update’
- Enter a name for the Storefront (not required)
- That’s it!
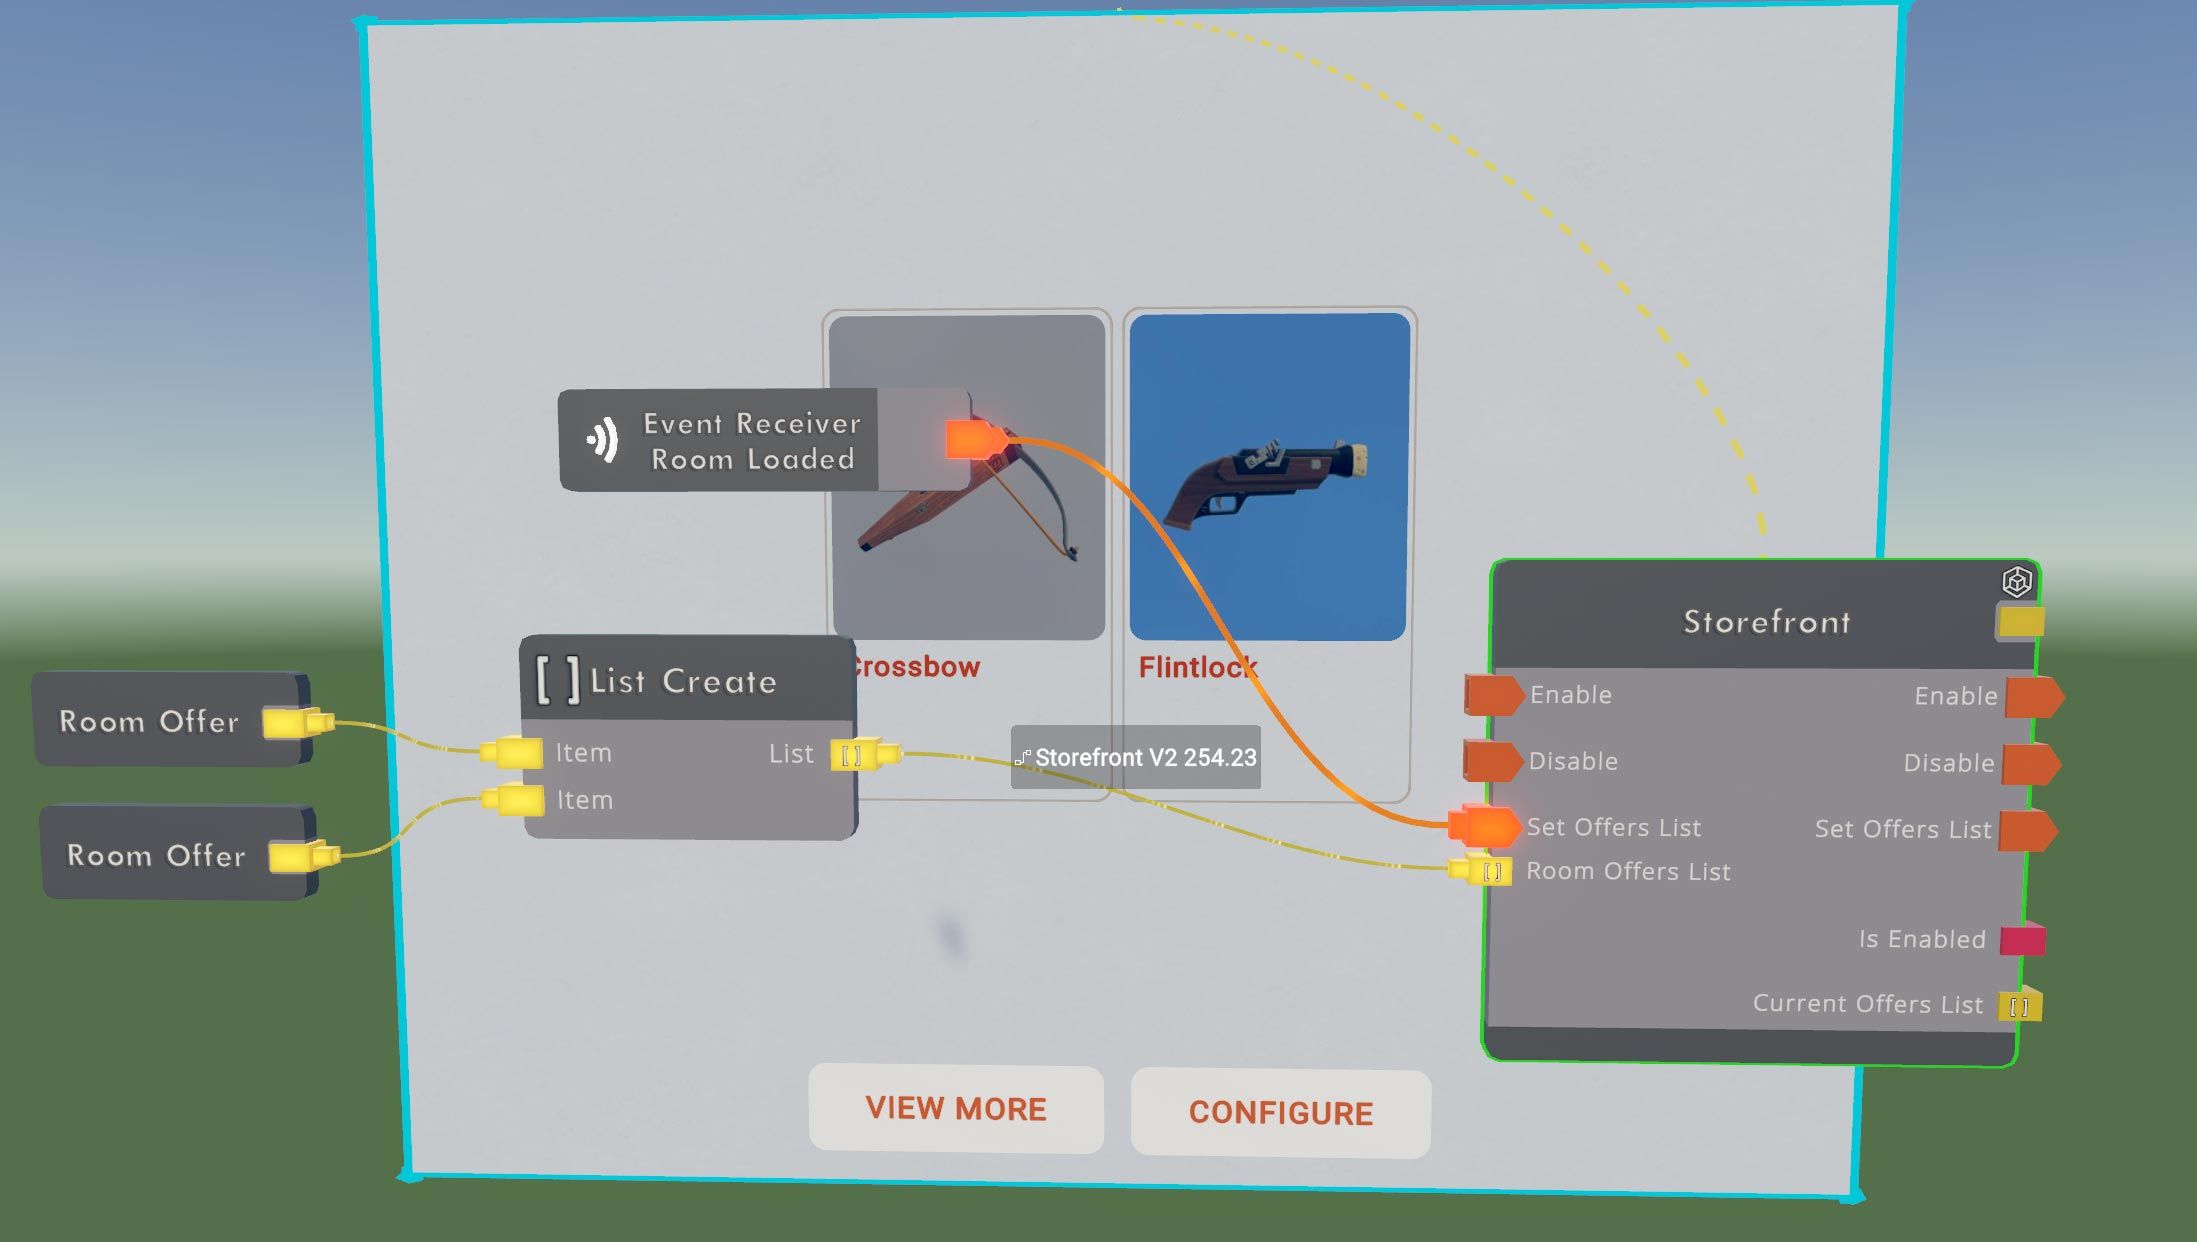
Adding Offers to a Storefront via circuitsHere’s what you need:
- Storefront V2
- ‘List Create’ chip
- ‘Room Offer Constant’ chip (however many you want; at least one)
- Some event to enable the Storefront (In this case, we’ll use ‘Event Receiver: Room Loaded’)
First, make the following configurations:
- ‘Room Offer’ chip configured to the appropriate Offer (repeat for each one)
Next, make the following connections:
- ‘Room Offer’ (Room Offer) → ‘List Create’ (Item) (Repeat for each ‘Room Offer’ chip)
- ‘List Create’ (List) → Storefront (Room Offers List)
- ‘Event Receiver: Room Loaded’ (exec) → Storefront (‘Set Offers List’ exec)
Components
Configurables
- Edit Storefront - Takes you to the Offers selection window
- Synced - False = Local Player only can see the Storefront; True = Everyone can see it
- Rows/Columns - Resizes the Storefront to display a certain number of Offers
- Hide Storefront Background
- Enabled - Shows/Hides the entire Storefront (both background and Offers)
- Material
- Color
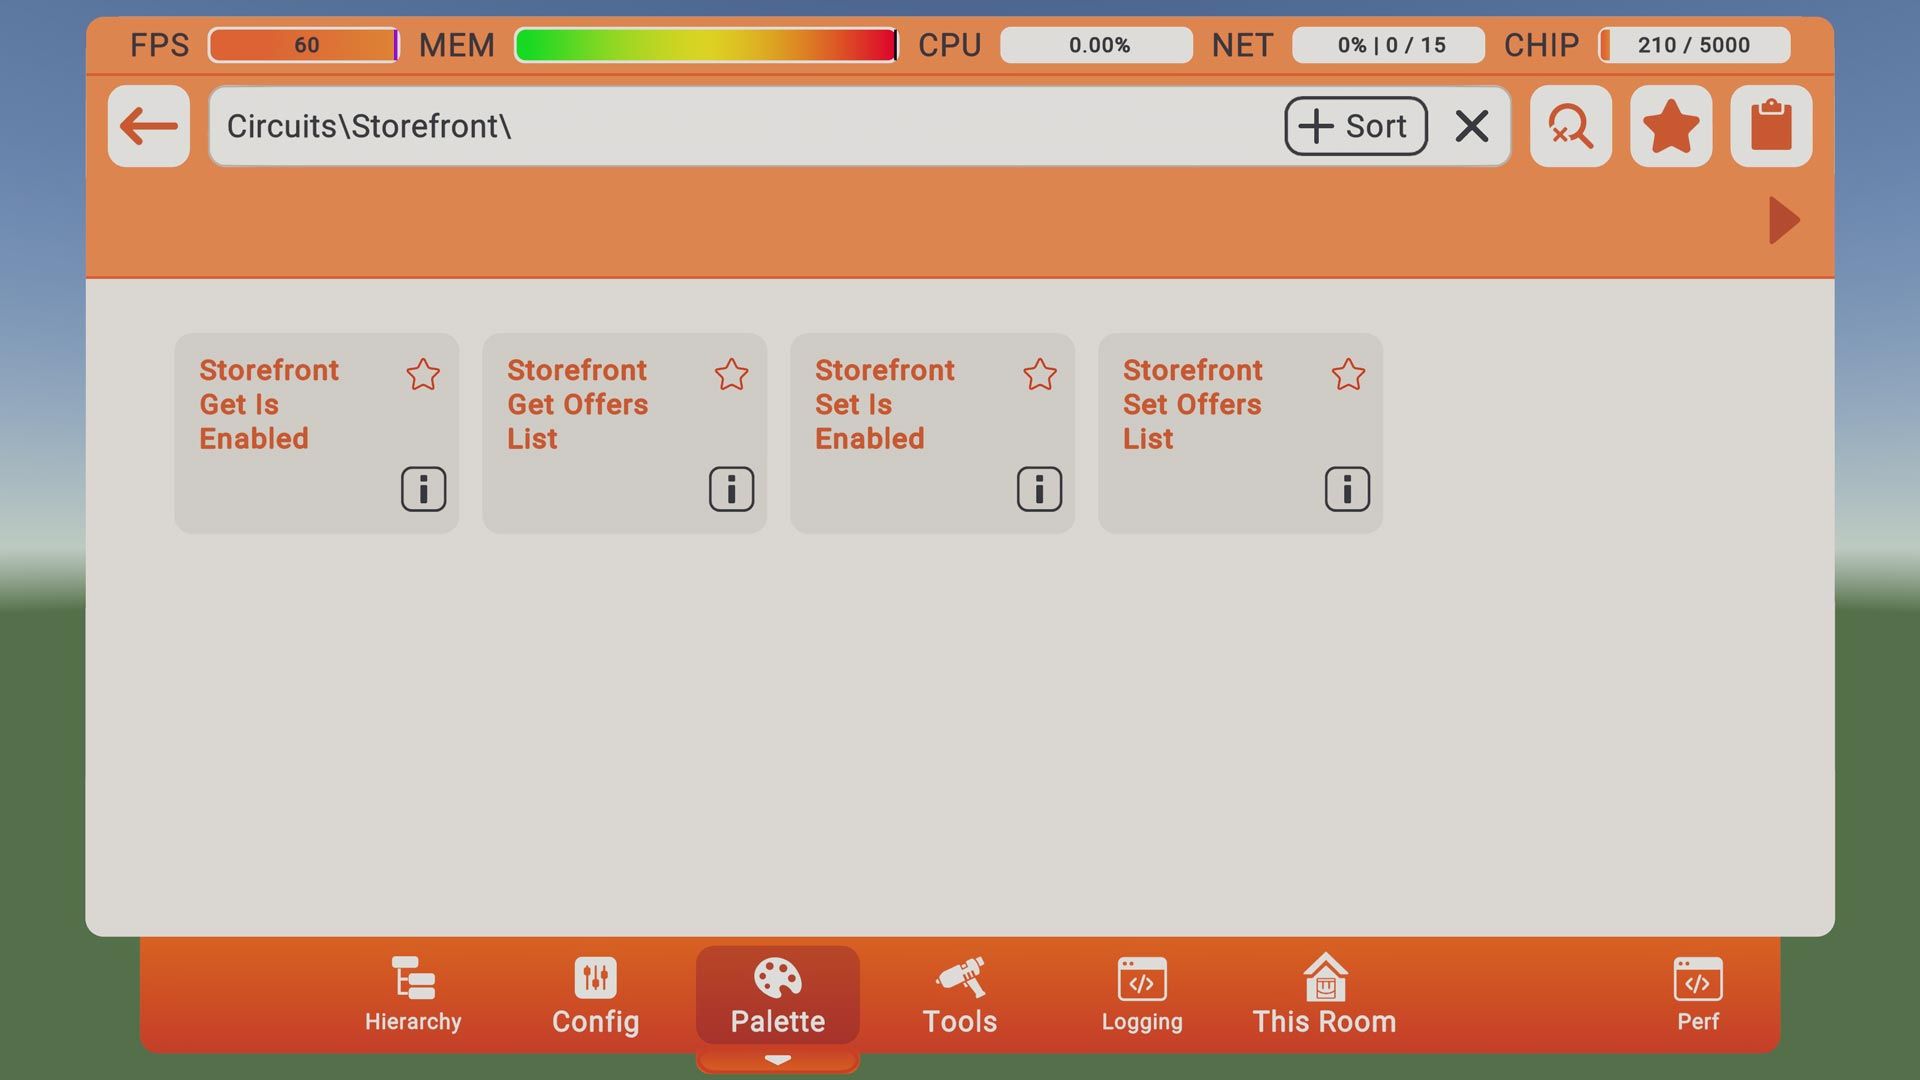
Circuits
- ‘Storefront Get Is Enabled’
- ‘Storefront Get Offers List’
- ‘Storefront Set Is Enabled’
- ‘Storefront Set Offers List’
What's NextDo you plan to allow Creators to sell their Custom Shirts via Storefront V2?The problem is: How do you differentiate between Avatar Items that you only wear inside of the Room (e.g., Costume Dummies) vs. Avatar Items that you wear across multiple Rooms? While we don’t have an answer to that yet, Storefront V2 is currently designed to focus exclusively on In-Room Econ tools only (i.e., Offers). With that said, we will eventually want a way for Creators to sell their Custom Avatar Items inside of Rooms. That may mean providing support for Storefront V2, a completely different Storefront, or something like a Link Button.
There are two big steps we want to take with Storefront V2:
There are two big steps we want to take with Storefront V2:
- A chip to trigger the Storefront in the Watch (i.e., the page you see when you click ‘View More’)
- More UI sections. Currently, there is just a single grid. In the future, we want to experiment with adding Carousels and Banners, and let Creators choose which items get shown
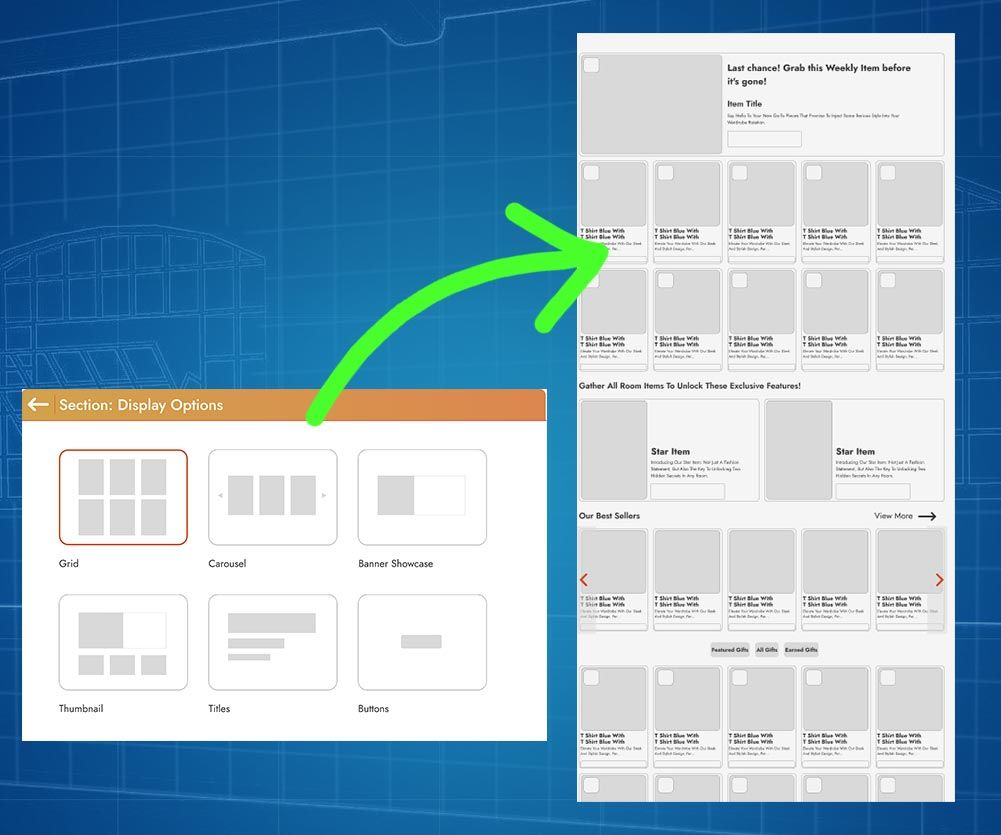
The goal with these iterations is to make it easier for Creators to increase visibility of their Offers in the context of their Rooms. It can be difficult to make sure you have a Storefront at every point in the Room, so giving a way to show it via the Watch will hopefully mean more views to your Storefront.Of course, we also want those views to convert to purchases, so having different UI sections gives Creators the ability to highlight their Offers in the way that leads to the most earnings.