Rooms 2.0 Compound Objects
How to combine multiple objects into a single, manageable unit, streamlining your creation process!
What is a Compound Object?A compound object is an object made up of other objects, just like things in the real world. If you took apart an oscillating desk fan you’d have a collection of other objects - blades, buttons, and motors. Attaching them to each other in the right order is what lets the blades of the fan spin while its head oscillates, but at the end it’s still just a fan that you can use without thinking about its many parts.An object here is defined as stuff in a container. Think of these containers like our old shape containers, except they can hold more than just shapes - chips, props, components, and even other containers. This is the basis of a compound object: containers with other containers inside them.
How do I get Started?In Rooms 2, compound objects are the only way to build! You don’t have to do anything special to get access to them other than select the “Maker Room 2” as your template when creating a new room.
How to make a compound objectThe backbone of compound objects is the container, a class of object that can have children (including other containers.) Containers can be re-named and have object boards, and most of a compound object’s settings will be in the config of the outermost, or top, container.
Only containers can have children!
There are three kinds of container:
“Scope” is a layer of the hierarchy. Your current scope determines what you can select, and in some cases, what you can see.“Room scope” is as far out as you can get. If you’re inside a container or circuit board, you’re in its scope, and anything that isn’t “in scope” for editing will be faded or hidden. “Scoping” in or out means changing layers.
You make a compound object by assembling a hierarchy of containers with stuff in them. There are a number of ways to do this!
Only containers can have children!
There are three kinds of container:
- Basic Containers don’t do anything special beyond containing other objects. You can think of these kind of like Shape Containers in old rooms, except that they can hold more than just shapes.
- Gizmos are containers that can move their children. Right now, this is just the piston and rotator (and see the “gotchas” section at the end for some extra detail about working with them.)
- Props, including Studio Props, are containers with at least one special child that can’t be deleted. This special child may do special things, and your ability to modify it may be limited, but you can still treat props like compound objects in most other ways. The special child will usually be locked to the pivot point.
“Scope” is a layer of the hierarchy. Your current scope determines what you can select, and in some cases, what you can see.“Room scope” is as far out as you can get. If you’re inside a container or circuit board, you’re in its scope, and anything that isn’t “in scope” for editing will be faded or hidden. “Scoping” in or out means changing layers.
You make a compound object by assembling a hierarchy of containers with stuff in them. There are a number of ways to do this!
- If you create a new shape at room scope, we’ll add a container above it for you. You’ll be moved inside the scope of your new container so you can just continue building, just like old shape containers. You can now add more stuff to this scope, or “Edit out” to return to room level.
- The Quick Action Menu when using the Select tool allows you to “Create Object,” which will place your selection into a new container with the pivot point at the center. This works on multi-selections, and will group everything in your selection together into one new container.
- The Connect Tool can create a compound object by connecting one object to another. This will attempt to make the first object a child of the second. The selection order matters!
- If the parent object is a container, the first object will become a child of the container.
- If the parent is a shape or component, it will be put into a new container, and then the first object will become a child of that container. This is because only containers can have children.
- When the target parent is a gizmo, you no longer have to target a specific part of the gizmo mesh. It’s just about the order.
- The Hierarchy Tab, new in Rooms 2, allows you to drag and drop to assemble or modify a compound object. Drag a child object to the room title to move it to room scope.

You can use any of these tools at any scope. Using “Create Object” on a selection of child objects will create another container, and those shapes will end up one scope lower than they were before.
Note: Hierarchical operations do not currently work on chips. It’s recommended to create chips at the intended scope or use copy/paste.
Note: Hierarchical operations do not currently work on chips. It’s recommended to create chips at the intended scope or use copy/paste.
There are a few ways to navigate a hierarchy, as well.
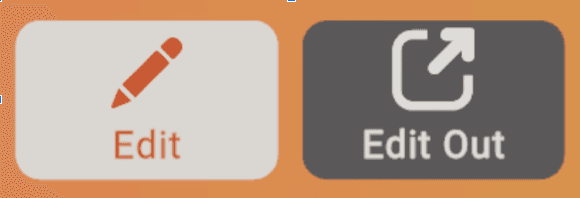
- With the maker pen, use the “Edit” and “Edit Out” buttons to navigate up and down a hierarchy. Edit Out will take you up a scope, and the Edit tool will take you into the scope of whatever your highlighted target is.
- In Advanced Creation Mode, use hotkeys 1 and 2 to access Edit and Edit Out respectively. These hotkeys will operate on whatever you’ve got selected, rather than activating a tool that requires another click.
- In the Hierarchy window, treat each object name like a dropdown, and navigate its hierarchy by clicking on any layer, which will move you to that scope.
- When using the Select tool, you’ll also find these options in the Quick Action Menu. Edit Out will always be available if you’re inside an object, while Edit In will only be available if your selection is a container.
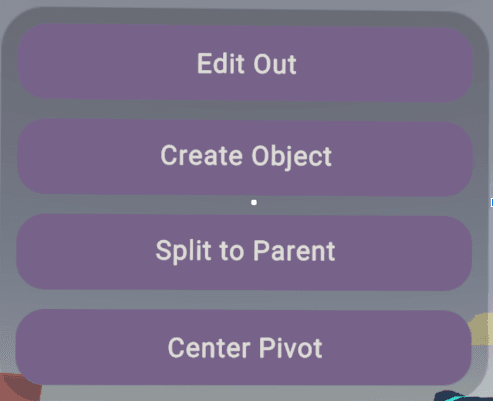
The Quick Action Menu also contains other useful options:
Don’t like seeing the word “container” everywhere? Name your objects in the config menu!
- Split to Parent moves the selected object up one scope
- Split to Room moves a selected object up to the room scope
- Create Object is always present to let you add another layer to the hierarchy
- Center Pivot will center the object point (& therefore the container’s pivot) on your current selection.
Don’t like seeing the word “container” everywhere? Name your objects in the config menu!
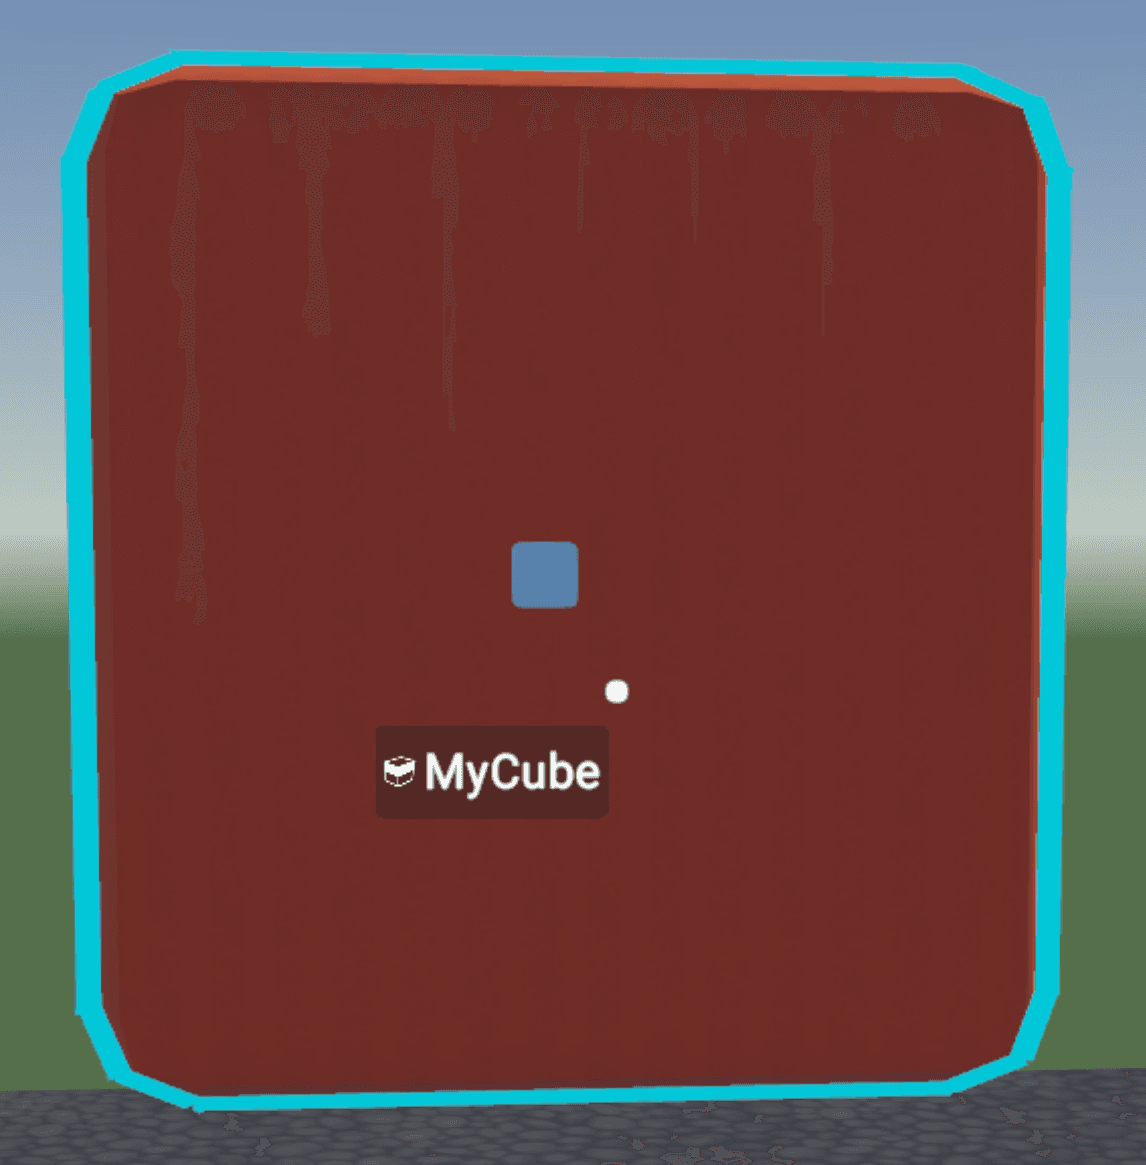
New VisualsWhen you start working in Rooms 2, you’ll notice some new UI for objects. If you point at a shape, chip, component or prop within your current scope, it will highlight in green as it always has. But if what you’re hovering over is a compound object - a container with stuff in it - it’ll be blue instead, and you’ll see its name and a small holographic box that represents its pivot point.
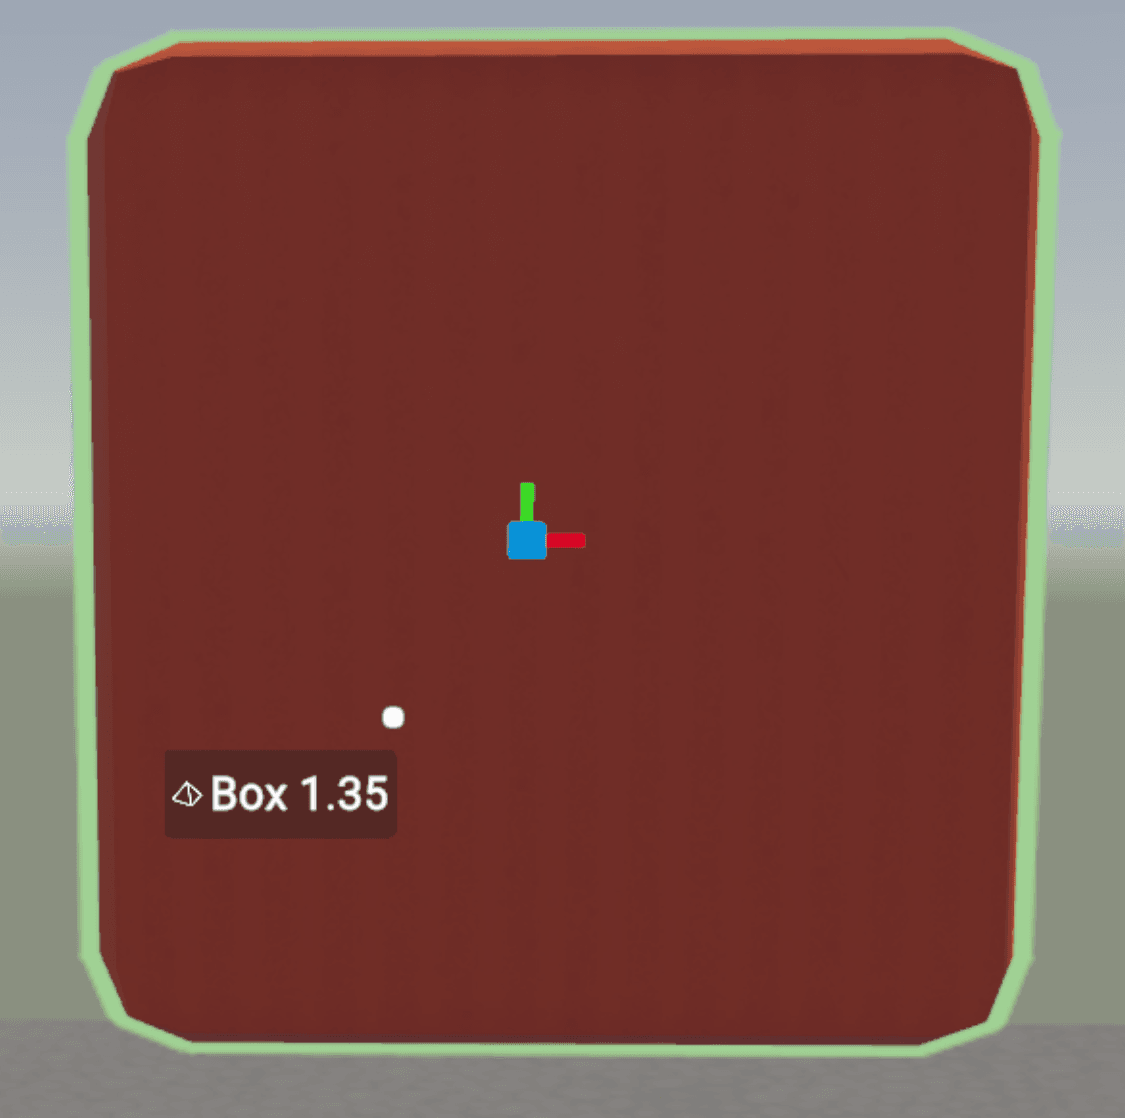
When you edit into an object, the holographic pivot point preview expands into a small UI widget that shows local axis colors and can be selected, moved, and rotated. We call this the “object point.”By moving the object point, you’re also moving the pivot point of the object, and when you edit back out again, you’ll see that the holographic pivot preview has moved in response to the changes you made. The object point also determines where an object board attaches, and is used as the object’s position for the purpose of Set Position and other transformations.
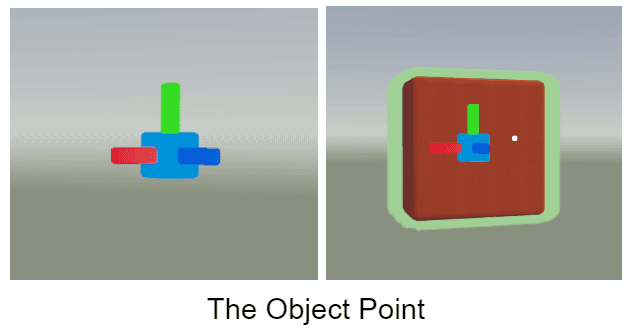
The blue axis is “forward!”
Each type of object also has its own icon, which shows up alongside object names when hovering or selecting, in the hierarchy viewer, in Rec Room Studio, and in some parts of the palette.
Container, shape, and component icons!
Hierarchical CircuitsEvery object scope has a matching circuit scope, and as you navigate up and down an object’s hierarchy, you’re simultaneously navigating that object’s circuit hierarchy, too. Any container with chips has an object board that displays the same name as the container. Editing the object or its board will take you into the object’s scope.As you navigate a hierarchy, chips appear or not based on whether or not they’re in your current scope. While objects above your scope are grayed out, all chips outside of your scope are hidden completely (though there’s a setting to change this if you’d like to.)Reparenting an object with a circuit board takes all the child objects - and all the child circuits - with it.
Tip: Moving objects to a new scope breaks wires between the stuff you move and the stuff you don’t. We recommend that you get your hierarchy built before you do a bunch of wiring!
Wiring data across scopes requires adding ports to the object boards in order to pass data up or down. Adding ports can be done in the config menu of either the object board or the “In/Out” chips that appear inside its scope, and we hope to make this process faster and easier going forward.
Physics, Grabbable and Other SettingsMost of a compound object’s important settings are on the root object. This includes:
- Name
- Tags
- Physics
- Gravity
- Interaction filters (Coming soon)
- Locomotion options
- Collision layers ..and more!
Known Issues
Chips move around sometimes!
- They’re containers, but they don’t look like containers. They look like the old gizmos.
- Despite the fact that they’re supposed to be containers, you can’t put shapes directly under them - you’ll see that another container gets added in there. This won’t be true forever, but for now it can be a little confusing.
Chips move around sometimes!
- When spawned using chip snapping, chips may not show up exactly where you expect them to
- When reparenting objects, their object boards may end up somewhere unexpected
Got Feedback?We’d love to hear about any bugs or other feedback you may have for us. Please leave your suggestions on our upvote board to join the conversation.